
Setup Instructions
- Create a new user
- Create a New Permission Group for the User
- Create and Assign Permissions Group
- Create an OAuth 2 Client
Create a new user
From the SAP admin center,
- Go to the search console and type in Import Employee Data.
- Click on the action that appears.
- Click Import data and then select Download Template.
- Click on the field next to Select an entity, then Basic Import.
- Click Generate Template.
- You'll receive a .csv file to download. It likely contains two rows.
-
Add an additional row and fill out at least these fields
- Status: active
- User ID: SFAPI_INTEGRATION (for example, any value possible)
- Username: SFAPI_INTEGRATION (for example, any value possible)
- First name: API (for example, any value possible)
- Last name: Integration (for example, any value possible)
- Email: integration+user@example.com (any value possible - doesn't have to be a valid email)
- Manager: NO_MANAGER
- HR: NO_HR
- Default locale: en_US
Your CSV should now look something like this example CSV.
Note:
Be sure to generate your own .csv template. DO NOT download this example, as your SuccessFactors instance will be configured differently.
- Click Download Template, then Import Dat" to switch back.
- Click on the field next to Select an entity, then Basic Import.
- Click Browse and select your .csv file to upload.
- Click Validate Import File Data.
- If you see the Validation Successful dialog, click on the Import button.
- You should now see this success dialog.
- Keep the .csv file open in the background, as you will need to reference it later.
- You can ensure the creation succeeded by searching for the employee name (first name and last name) or username and seeing it under the People section. Don't be confused if the new user doesn't show up immediately, it can sometimes take a few minutes for the user to show up in the search.
- Once the user shows up, you can move on to creating the permissions group.
Creating a New Permission Group for the User
- Search Manage Permission Groups in your search bar to navigate to the Permission Groups page.
- Click Create New to begin creating a new Permission Group for linking.
- Choose a name you'll remember that will help track that this Permission Group is for this specific connection.
- The User Type needs to be Employee, and the Choose Group Members should include the User you created above.
- You do not need to input anything in regards to the Exclude Section, or the Granted Permission Roles at this time.
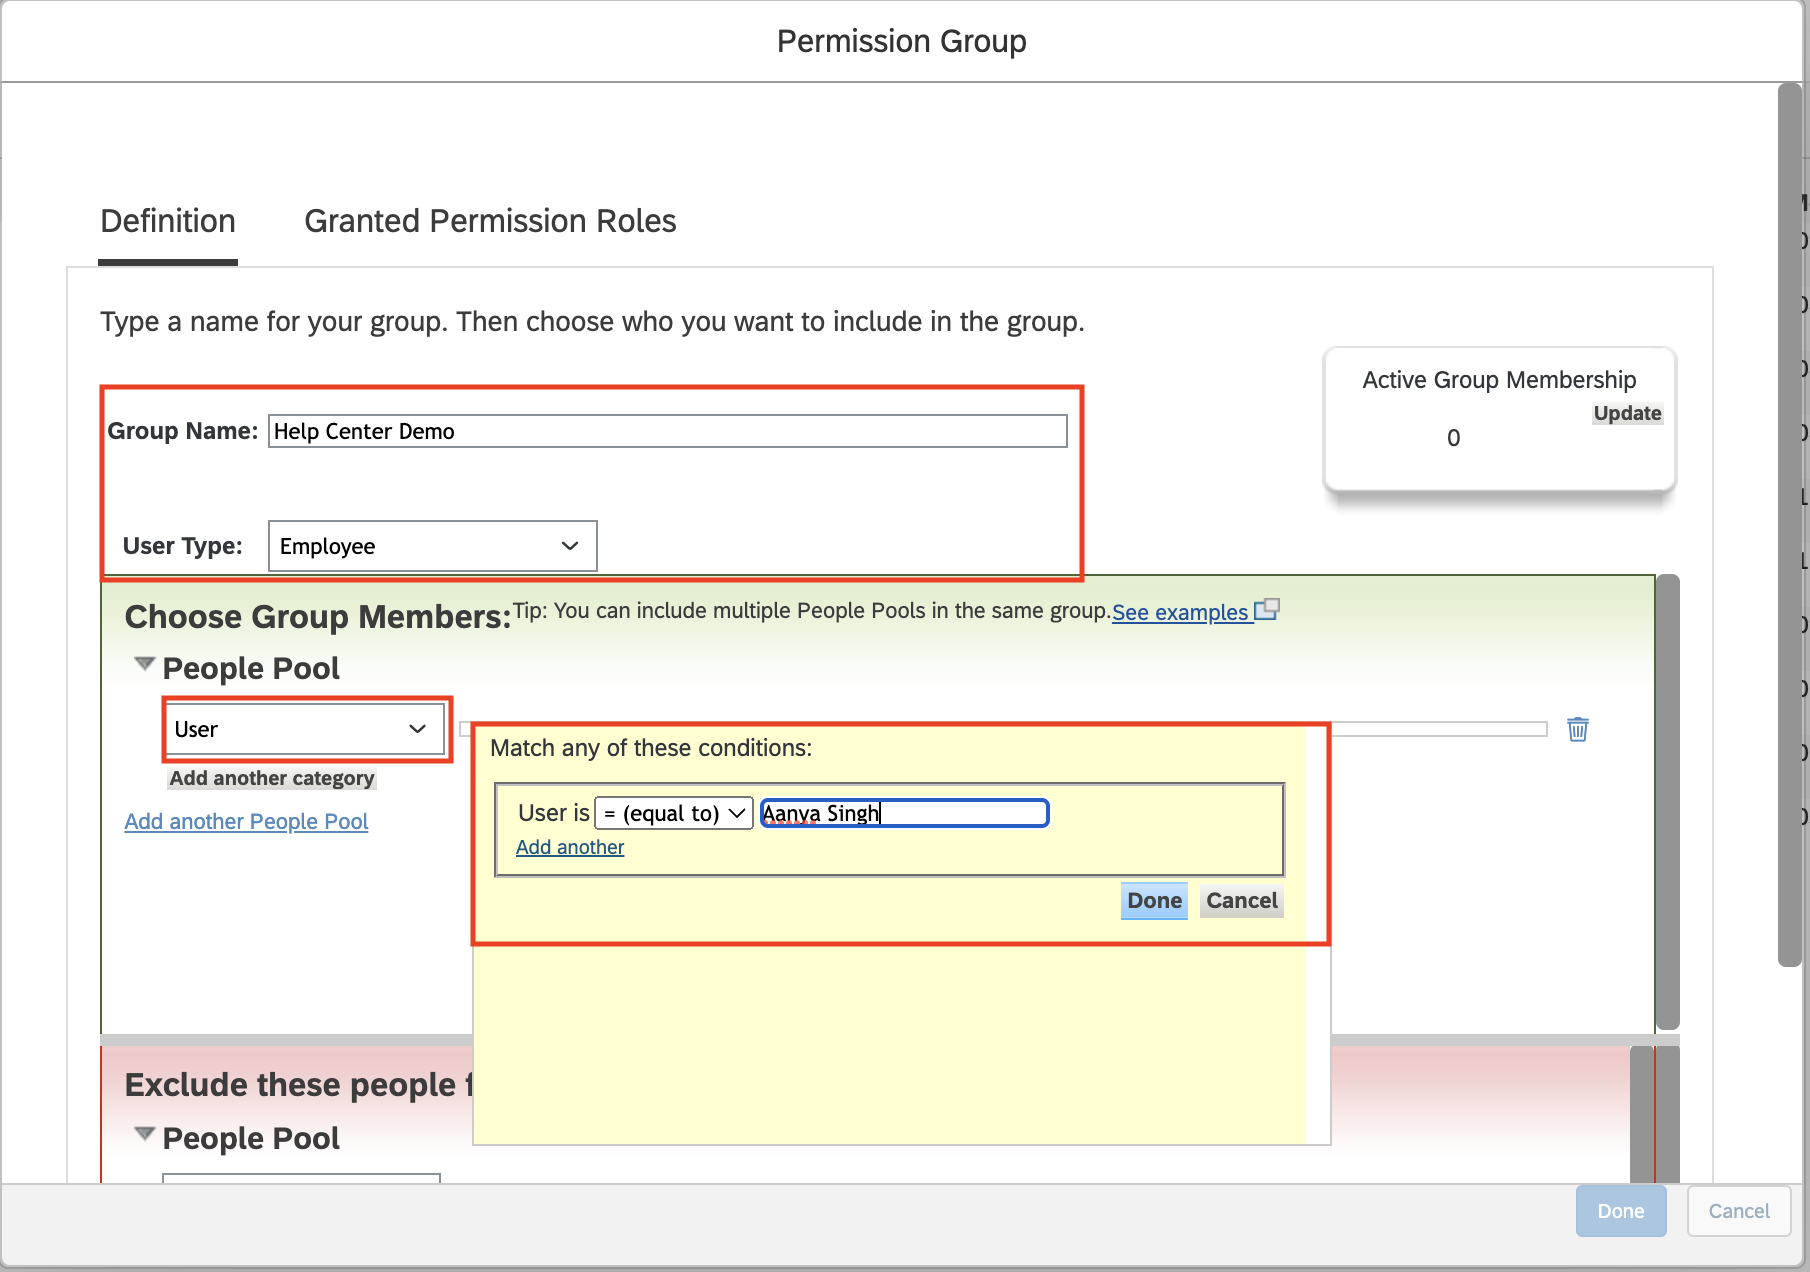
- Click Done to create and save this Permissions Group.
Create and Assign a Permissions Group for the "target" employees
- If you want to only provide access to certain employees (employees within a given company, non-contingent workers, etc) and don't already have a Permissions Group for the target audience, follow the steps in this section.
- Click Create New to begin creating a new Permission Group for the target audience.
- Give the group a name like "<integration name> target audience".
- Apply the filters:
- The example below provides access to employees in Atlanta.
-
Note, you can test the filters by clicking Update, then selecting the Active Group Membership number.

- Once done specifying the filters, click Done.
Create Permission Role with proper permissions
- Search Manage Permission Roles in your search bar, then navigate to the Permission Role page.
- Begin creating a new Permissions Role by clicking Create.
- Configure the name of the Group, then click Next.
- Choose a name you'll easily remember that will help track this specific connection.
- Identify and select the permissions that matter for the use case you are trying to achieve. Assign the correct permissions to the permission group. To do this:
- See the needed permissions in the connection flow.
- For each bullet, find the permission category in the sidebar. I.e. for "Manage System Properties", find the corresponding permission group in the sidebar of the SF UI. You can find these more easily by pressing STRG + F and pasting the permission there.
- Now for each sub-bullet, click the right permission in the category.
- Below is a list of permissions required for the integration:
- Once you've checked all necessary permissions, click Done.
-
Now click Add.
- In the new window, click Select.
- Enter the name of your permission group and select it.
- Click Done. You should now see your permission group.
- Click Done again.
- Click Save Changes.
- After setting the permissions, click Next in the bottom right.
- Review the permissions one more time, then click Save.
-
A pop up will appear asking if you want to continue to assign the role. Click Yes.

- You'll be taken to a Role Assignment screen. In the Basic Information tab make sure the below is populated, then select Next.
- Name: can leave as is
- Target Population User Type: Employee
-
Status: Active

-
In the Grant Access To tab, grant access to the User you imported above by selecting the Permissions Groups you created above, then click Next.

- You'll be taken to the Define a Target Population tab. IMPORTANT TO NOTE:
- If you want to grant access to all users and employees:
- Select Everyone.
- If you want to only grant access to specific employee:
- Select Filtered By.
- Choose Permission Group.
-
Select the Permissions Group for the target employees that you created above.

- If you want to grant access to all users and employees:
- Select Next to proceed to Define Data Blocking.
- Note, depending on your selected permissions, you might not have a Data Blocking step.
- Leave the default Data Blocking selected and select Next to proceed to the Preview.
- Review your setup, then select Save.
Create an OAuth 2 Client
To register an OAuth 2 client, follow the instructions in this article from SAP's Help Center.
Required API Requests
For reference, see the SAP SuccessFactors Recruiting ODATA API. Your SAPSF Admin user will need access to all of the below APIs and Domain Security Policies, then provide copies to your Findem Customer Success Manager (CSM).
You'll need to select the permissions in SAPSF below. After selecting each applicable permission, click Save. Note, the permissions not listed here are not required from Findem. You won't need to provide access to those.
| Object | Method |
| Candidates | Get, Post |
| JobRequisition | Get, Post |
| JobApplication | Post |
| Job Application Comments | Post |
| Job Application Status | Get, Post |
| JobRequisitionPosting | Get, Post |
| JobOffer | Get, Post |
| User | Get, Post |
| Picklist | Get, Post |
Connecting Your Account
To authenticate your SAP SuccessFactors account, you will need to provide the following information:
API Server URL
Username
Company ID
OAuth Credentials
This section will walk you through finding or creating those credentials within SAP SuccessFactors and entering them into the linking flow.
Prerequisites
You must be an Administrator user in your company's SAP SuccessFactors instance, or someone who has that access will have needed to share it with you.
Instructions
Step 1: Find your API Server URL at this link
-
In the listed API Server URLs, search for the environment that matches your subdomain.
-
For example, if your domain was https://salesdemo4.successfactors.com, search for salesdemo4.

If you are unsure what your API Server URL is, or are having trouble connecting, we recommend reaching out to your SAP Support team to obtain your API Server URL
-
Step 2: Enter the URL into the linking flow
Copy the entire URL. In this example, it would be: apisalesdemo4.successfactors.com.
Enter your SAP SuccessFactors API Server URL into the integration authorization component.
Step 3: Find your SAP Username and Company ID
-
To find your SAP SuccessFactors username, go to the upper right hand side and click on your profile image to view your username.

-
To find your SAP SuccessFactors Company ID, in the same dropdown menu, click Show version information. Locate Company ID in the modal that pops up:

Once you obtain your username (not email) and company ID, enter them in the linking flow.
Step 4: Find your SAP SuccessFactors Client ID and Secret by generating a certificate
-
In your Admin Center, go to Tools, and search Manage OAuth2 Client Applications (If your page looks different, search for Manage OAuth2 Client Applications in the search tool on your homepage).

-
Click Register Client Application.
-
Fill out Application Name and Application URL (it does not matter what you input here, just as long as you remember it. However, the URL has to begin with https://).
-
Click Generate X.509 Certificate. Fill out Common Name (the name doesn't matter; just make it something you'll remember) and click Generate.

-
Once the certificate populates, download and save it. You will have downloaded a file called Certificate.pem.

Click Register (it will have replaced the Generate button).
Back on your Manage OAuth2 Client Applications, go to the application you just created and click Edit.
-
You will now see an API Key listed - this is your Client ID. Copy and save this key somewhere you have easy access to. You'll need it shortly.

-
Open up the "Certificate.pem" file that you downloaded previously in a text editor. The string between ——BEGIN ENCRYPTED PRIVATE KEY——- and —-END ENCRYPTED PRIVATE KEY——- is your Client Secret. Copy the Client Secret and paste it somewhere you have easy access to.

Back in your Findem instance:
- Log into Findem and navigate to Admin > Integrations.
- From the Connect ATS menu, select Manage > Connect your ATS system.
- Select SAP SuccessFactors from the ATS options.
- Fill in the requested fields (information you retrieved in the steps above) and click Save.
To Consider...
- Note that candidate rejection reasons are powered by the permissions given by the Admin user. This can lead to situations where a user in Findem is able to access rejection reasons that are available due to the permissions of the API user, but be unable to use/access those same reasons because their user account lacks them in SAPSF. In short, Findem will respect the permissions and limitations setup on the SAPSF side, and will not overwrite them. For this reason, please ensure that the reasons available for the API user are also available for the general user population.
Comments
0 comments
Please sign in to leave a comment.